Drupal and the secret of my success
As my tenure on the Drupal Association was concluding, I was asked to give the Keynote for …
MongoDB is the most full featured scalable database taking the tech world by storm. Drupal is the standard in content management powering magazines, blogs online newspapers and much more. It’s only natural that they would get together to provide a fast dynamic scalable CMS system. Whenever a Drupal site needs to scale dynamic content they turn to MongoDB to be able to deliver. The Examiner.com was the pioneer in this approach and many Drupal sites have followed suit.
Here’s how to get started with a MongoDB backed Drupal.
As it currently stands it is not possible for Drupal to run a pure MongoDB installation with Drupal. Drupal has made a lot of progress towards abstracting out database connectivity into a central model layer with Drupal 7 and Drupal 8 promises even more. However it is still a work in progress and while a majority of the functionality is available as MongoDB backed, as it stands today a few of the components remain dependant on SQL.
As most of the work to port Drupal to MongoDB has been towards scalability and performance, it is possible to have a site where public page views are 100% on MongoDB. Performance benchmarks on a MongoDB backed Drupal instance are quite impressive.
These are the very brief instructions and make some assumptions. For more complete installation instructions please see the documentation.
apt-get install mongodb-10gen or yum install mongodb
Follow the install directions on the MongoDB site.
brew install mongodb
The complete directions can be found in the MongoDB PHP documentation.
Pecl is the preferred way to install the MongoDB driver. If you haven’t used pecl before, you may need to install some prerequisites first.
pecl install mongo
Using your favorite editor add the following line to your php.ini file.
extension=mongo.so
This is the most complicated part and I will simply provide the excellent directions already given in the Drupal install.txt file with a few clarifications.
You can obtain the latest Drupal release from http://drupal.org — the
files
are available in .tar.gz and .zip formats and can be extracted using
most
compression tools.
To download and extract the files, on a typical Unix/Linux command line,
use
the following commands (assuming you want version x.y of Drupal in
.tar.gz
format):
wget http://drupal.org/files/projects/drupal-x.y.tar.gz tar -zxvf drupal-x.y.tar.gz
This will create a new directory drupal-x.y/ containing all Drupal files
and
directories. Then, to move the contents of that directory into a
directory
within your web server’s document root or your public HTML directory,
continue with this command:
mv drupal-x.y/* drupal-x.y/.htaccess /path/to/your/installation
Because Drupal stores all site information in a database, you must create this database in order to install Drupal, and grant Drupal certain database privileges (such as the ability to create tables). Currently this needs to be a relational database. Drupal supports SQLite, PostgreSQL and MySQL. For details, consult INSTALL.mysql.txt, INSTALL.pgsql.txt, or INSTALL.sqlite.txt. You may also need to consult your web hosting provider for instructions specific to your web host.
Take note of the username, password, database name, and hostname as you create the database. You will enter this information during the install.
To run the install script, point your browser to the base URL of your website (e.g., http://www.example.com).
You will be guided through several screens to set up the database, add the site maintenance account (the first user, also known as user/1), and provide basic web site settings.
During installation, several files and directories need to be created, which the install script will try to do automatically. However, on some hosting environments, manual steps are required, and the install script will tell you that it cannot proceed until you fix certain issues. This is normal and does not indicate a problem with your server.
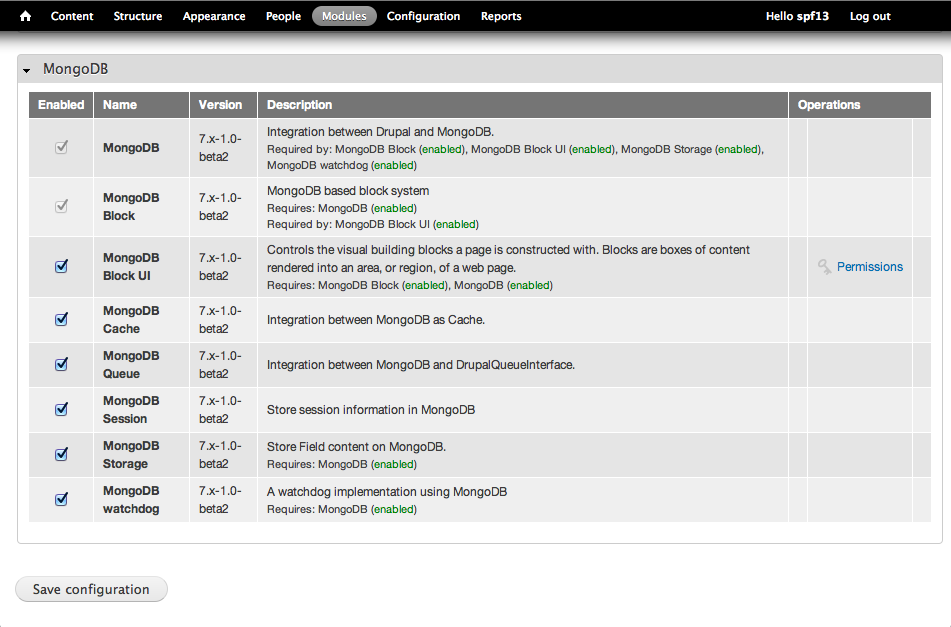
The MongoDB Drupal plugin installs like any drupal plugin. Either install via the administration screen, or simply download the module at http://drupal.org/project/mongodb and uncompress it into the sites/all/modules/ directory.
Currently there isn’t an admin interface to configure MongoDB, luckily it’s easy enough to configure manually.
First create a file called local.settings.php (it should be in the same directory as settings.php).
Populate the file with the following contents. Make sure to replace the placeholders [YOURDATABASENAME] and [SITENAME].
YOURDATABASENAME name can be anything doesn’t need to be created prior to use. SITENAME will either be your sitename as it is named in Drupal. It may be called ‘Default’ if this is the primary site for the Drupal installation.
<?php
#MongoDB $conf['mongodb_connections'] = array(
    'default' => array(
    'host' => 'localhost', // Connection name/alias
    // Omit USER:PASS@ if Mongo isn't configured to use authentication.
    'db' => '[YOURDATABASENAME]' // Database name. Make something up, mongodb will automatically create the database.
    ), );
include_once('./includes/cache.inc');
# – Configure Cache
$conf['cache_backends'][] = 'sites/[SITENAME]/modules/mongodb/mongodb_cache/mongodb_cache.inc';
$conf['cache_class_cache'] = 'DrupalMongoDBCache';
$conf['cache_class_cache_bootstrap'] = 'DrupalMongoDBCache';
$conf['cache_default_class'] = 'DrupalMongoDBCache';
# – Don't touch SQL if in Cache
$conf['page_cache_without_database'] = TRUE;
$conf['page_cache_invoke_hooks'] = FALSE;
# Session Caching $conf['session_inc'] = 'sites/[SITENAME]/modules/mongodb/mongodb_session/mongodb_session.inc';
$conf['cache_session'] = 'DrupalMongoDBCache';
# Field Storage $conf['field_storage_default'] = 'mongodb_field_storage';
# Message Queue $conf['queue_default_class'] = 'MongoDBQueue';

?>
Login to your drupal administration screen.
Navigate to the modules management screen.
First we need to disable the block module from Drupal Core. This will conflict with the MongoDB Block module and Drupal won’t let you enable the MongoDB plugin with this enabled. Uncheck Block and click save.
Now as the screenshot below demonstrates scroll to the bottom of the modules adminstration screen to the MongoDB section and enable all the modules.
As my tenure on the Drupal Association was concluding, I was asked to give the Keynote for …
This presentation will give developers an introduction and practical experience of using MongoDB with the Go language. MongoDB Chief Developer Advocate & Gopher Steve Francia presents plainly what you need to know about using MongoDB with Go.
This presentation will walk you through the steps needed to get started with Go.